The Setup
A PHP Backend
To introduce a Redis layer between the frontend and backend, we first need a backend. For the sake of simplicity, I will create a simple API with PHP which returns a simple JSON object that is about 1MB in size:
index.phprequire __DIR__ . '/../vendor/autoload.php';

$dummy = str_repeat(
   'Lorem ipsum dolor sit amet, consectetur adipiscing elit. ',
   (int) (1024 * 1024) / 56
);

app()->get('/', function () use ($dummy) {
   response()->json([
    'message' => $dummy
  ]);
});

app()->run();
This endpoint exists purely as a test response. The snippet above uses LeafPHP. That said in other PHP Frameworks it would look quite similar. Since weâre discussing a headless architecture, the backend could just as well be:
- a REST JSON API,
- a GraphQL endpoint,
- Inertia.js controllers, or
- a minimal controller returning an HTML fragment.
Next.js Frontend
To scaffold a minimum Next.js App we use the create-next-app CLI tool:
npx create-next-app@latest appStart the development server with:
yarn devThen open the browser at http://localhost:3000.
Redis Caching Layer
Depending on your operating system and preferences installing Redis can be done in different ways. DDEV, brew, etc. we don’t want to conver the installation here.
Adding Redis Support to Next.js
yarn add ioredis
# npm install ioredis
Now let’s add a redis.ts so that ioredis knows how to connect to Redis.
lib/redis.tsimport Redis from 'ioredis';

process.env.NODE_TLS_REJECT_UNAUTHORIZED = "0";

export const redis = new Redis(process.env.REDIS_URL ?? 'redis://localhost:6379');
Make sure to adjust the host and port to your needs. You can do that in an .env file, too.
Now let’s add a custom fetch method, that makes use of our freshly added Redis Cache.
lib/fetchWithRedis.tsimport { redis } from './redis';
import crypto from 'crypto';

const TTL_SECONDS = 60 * 5;

function hashUrl(url: string): string {
  return crypto.createHash('sha256').update(url).digest('hex');
}

function getEtagCacheKey(url: string): string {
  return `etag:${hashUrl(url)}`;
}

function getDataCacheKey(url: string, etag: string): string {
  return `data:${hashUrl(url)}:${etag}`;
}

export async function fetchWithRedis(url: string): Promise<unknown> {
   const etagCacheKey = getEtagCacheKey(url);
   const etag: string | null = await redis.get(etagCacheKey);
   const headers: HeadersInit = {};
   if (etag) {
     headers['If-None-Match'] = etag;
   }

   const res: Response = await fetch(url, {
     headers,
     cache: etag ? 'no-store' : 'force-cache'
   });

   if (res.status === 304 && etag) {
     const dataKey = getDataCacheKey(url, etag);
     const cached = await redis.get(dataKey);

     if (cached) {
       return JSON.parse(cached);
     }

     // Cache inconsistency → safe fallback
     const fallback = await fetch(url, { cache: 'no-store' });
     if (!fallback.ok) {
       throw new Error(`Upstream error after cache miss: ${fallback.status}`);
     }
     return fallback.json();
   }

   if (!res.ok) {
      throw new Error(`Upstream error: ${res.status}`);
   } /* first fetch or etag changed */

   const data = await res.json();
   const newEtag = res.headers.get('etag');

   if (newEtag) {
     const dataKey = getDataCacheKey(url, newEtag);

     // Atomic write: ETag + data share the same TTL
     const pipeline = redis.pipeline();
     pipeline.set(dataKey, JSON.stringify(data), 'EX', TTL_SECONDS);
     pipeline.set(etagCacheKey, newEtag, 'EX', TTL_SECONDS);
     await pipeline.exec();
  }

  return data;
}
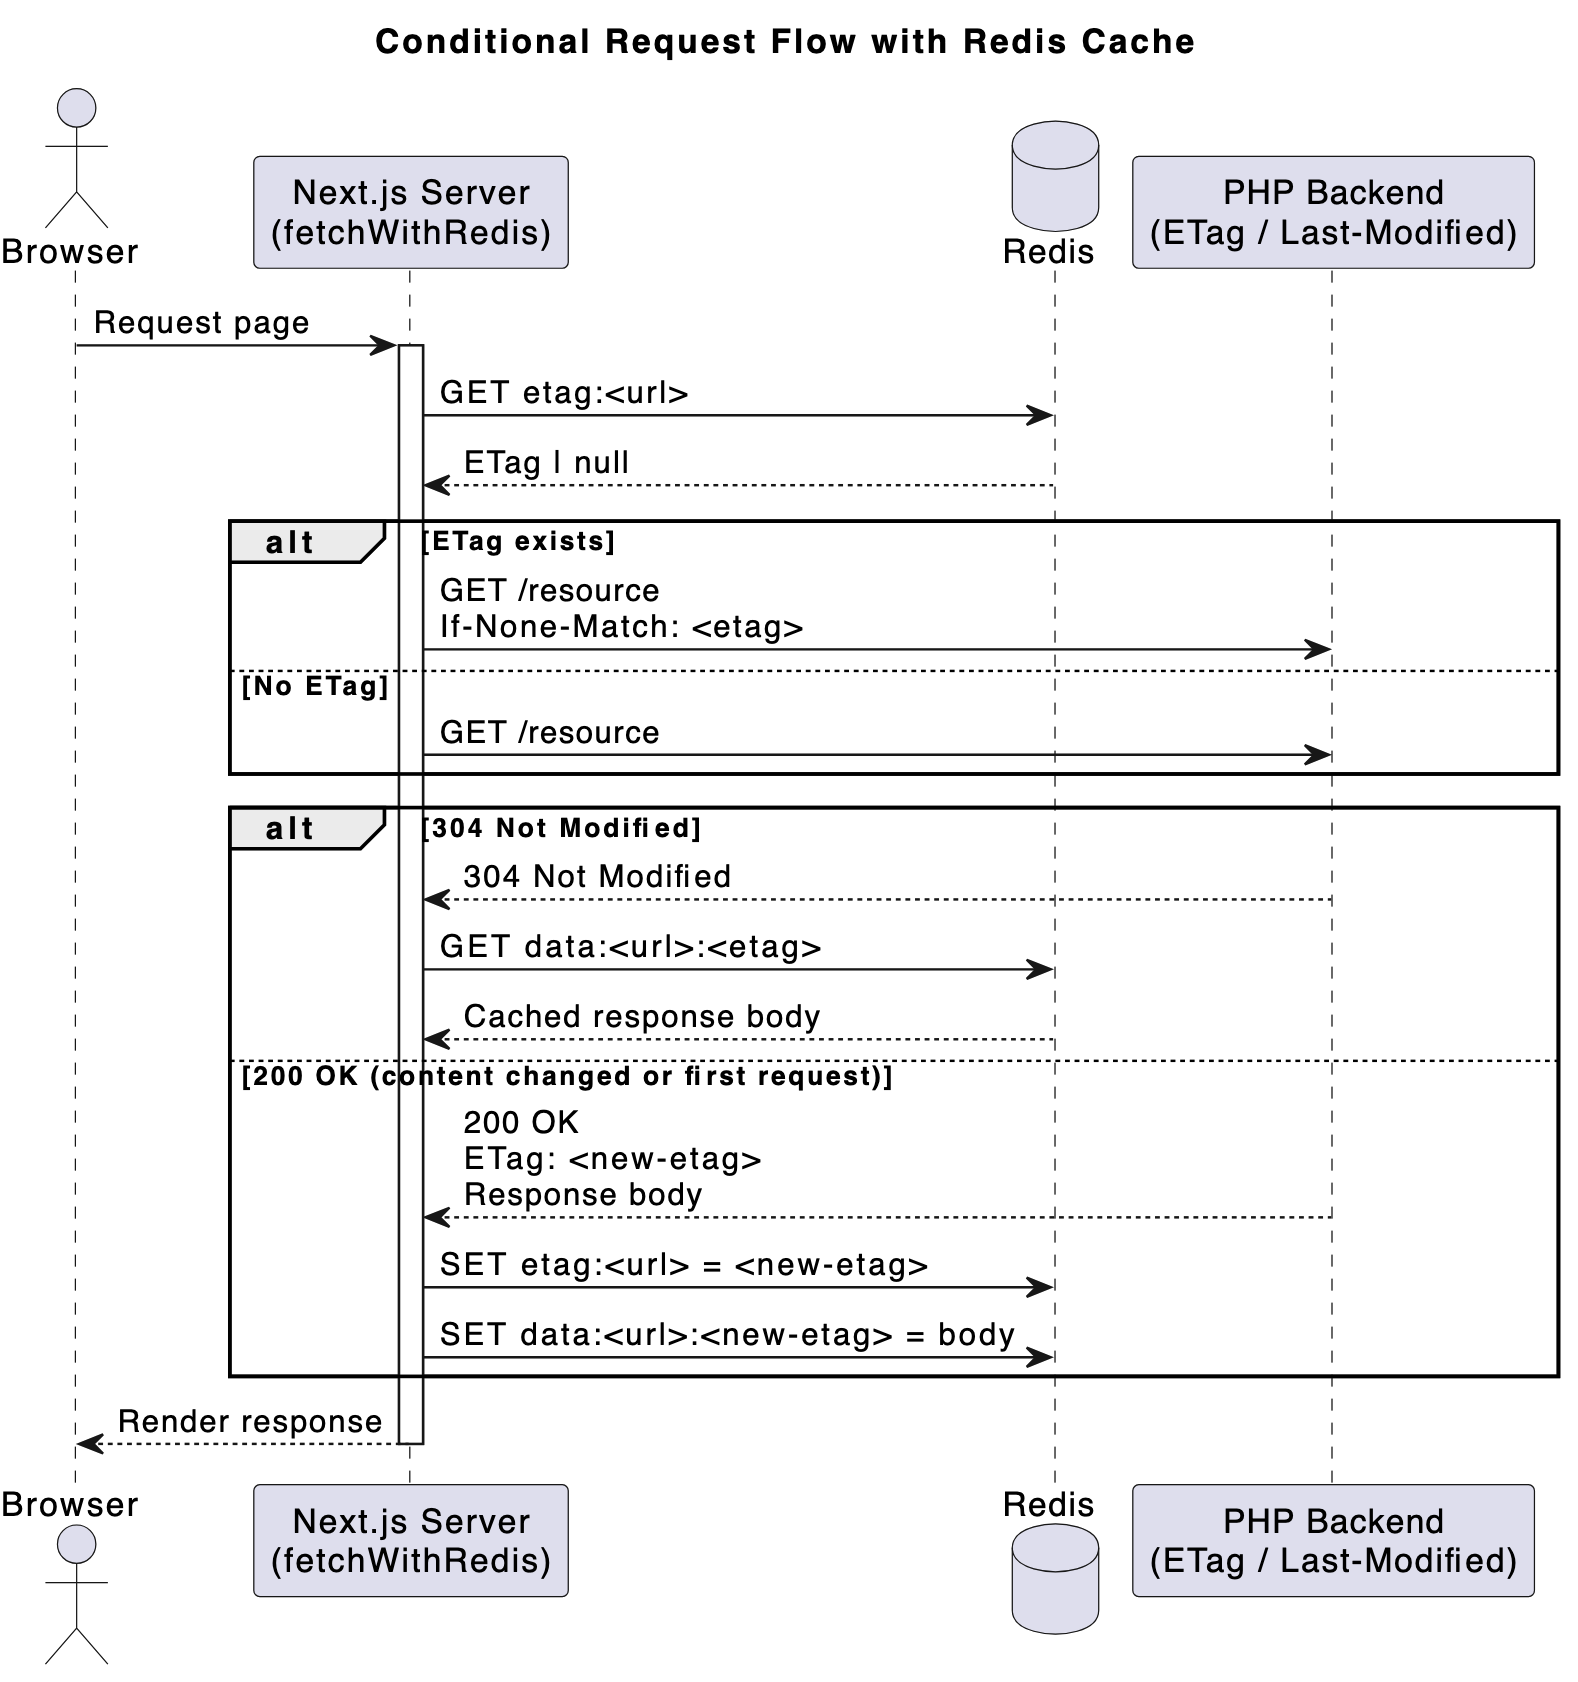
Let’s break down the main fetchWithRedis function. When requesting a URL:
- we look up a stored Etag value in Redis that was stored with the key
etag:<url> - we then fire up a classic fetch(url). If we had found a previously stored Etag, we also pass a
If-None-Matchheader. What this does is, it basically indicates to the Backend server, that we already know what the Reponse will be for a given Etag. The backend can respond in one of two ways: it can either decide: “hey, the content hasn’t changed. Use what you cached (HTTP Status 304)” or “The content has changed, I have a completely fresh Response for you (with a new Etag).”
We also explicitly disable Next.js’s built-in fetch cache when an ETag is present to avoid overlapping cache layers. - If the backend gave us a Status 304, we then get a second cache key from Redis:
data:<url>:<etag>which holds our previously cached response. In this case we do an early return, there’s nothing more to do. - If we had received a fresh Response (with Status 2xx) though, we need to update its Etag and store the new Response to a new cache key.
- To prevent unbounded cache growth, whenever writing to Redis we set a time-to-live (TTL). Even when ETags are used correctly, stale entries can accumulate if URLs change, content is removed, or cache keys are never revisited.
- We also use a crypto method to normalize keys. Using raw URLs as Redis keys could potentially lead to excessively long key names.
- Not all APIs support Etags. For these cases, the
Last-Modifiedheader can serve as a viable alternative for conditional requests. HandlingIf-Modified-Sinceindependently allows you to still benefit from conditional GETs and 304 responses, even without content hashes.
That’s basically it. You might have noticed the use of Etag here. If you’re not familiar with these, the technique is called Conditional Requests. Read more about it here:
- https://developer.mozilla.org/en-US/docs/Web/HTTP/Guides/Conditional_requests
- https://www.azion.com/en/learning/performance/what-are-conditional-requests/
- https://http.dev/conditional-requests
In a nutshell: it’s what browser caches do internally all the time, in order to reduce traffic, bandwidth and protect server resources. If an Etag and/or Last-Modified-Date is set on a Response, Browsers remember these. When there a subsequent requests to a known URL browsers send If-Modified-Since and If-None-Match headers with the Request. If the server responds with a 304 Status, the already cached version is used.
Usage in a Next.js page
app/page.tsximport { fetchWithRedis } from '@/lib/fetchWithRedis';

export default async function TestPage() {
  const data = await fetchWithRedis('http://localhost:5055/');

  return (
    <main style={{ padding: 24 }}>
      <h1>Test page Conditional GET with Redis Cache</h1>
      <pre>{JSON.stringify(data, null, 2)}</pre>
    </main>
  );
}
Here we simply use our custom fetch function to request a backend URL and render the response. Make sure to adjust the URL to a valid URL (wherever your backend or test backend actually responds).
For this to work correctly, the backend must support ETags (and optionally Last-Modified).
Let’s modify the Route:
index.php...
app()->get('/', function () use ($dummy) {
   $lastModified=filemtime(__FILE__); /* or any other mechanism to determine freshness */
   $etagFile = md5_file(__FILE__); /* or any other mechanism to generate unique hash */
   $ifModifiedSince = isset($_SERVER['HTTP_IF_MODIFIED_SINCE']) ? $_SERVER['HTTP_IF_MODIFIED_SINCE'] : false;
   $ifModifiedSinceTime = $ifModifiedSince ? @strtotime($ifModifiedSince) : false;
   $etagHeader = isset($_SERVER['HTTP_IF_NONE_MATCH']) ? trim($_SERVER['HTTP_IF_NONE_MATCH'], '"') : false;

   if (
    ($ifModifiedSinceTime !== false && $ifModifiedSinceTime >= $lastModified) ||
    ($etagHeader && $etagHeader === $etagFile)
   ) {
      response()
         ->status(304)
         ->sendHeaders();
      exit;
   }

   response()
      ->withHeader('ETag', $etagFile)
      ->withHeader('Last-Modified', gmdate("D, d M Y H:i:s", $lastModified)." GMT")
      ->withHeader('Cache-Control', 'no-cache')
      ->json(['message' => $dummy]);
});
So this is the counterpart to what we did earlier in the fetchWithRedis.ts file.
While servers like Traefik or Nginx can add Etags out-of-the-box – at least for static assets such as files and images, we want to control the freshness of dynamic PHP responses as well, whether it’s a JSON API, GraphQL response, HTML fragment, or something else.
Request flow comparison
without Redis/Etag: In the Happy Path, Next.js has the reponse in its cache (controlled by revalidate, cache options) – in the Sad Path, the backend is hit which always returns a full reponse.
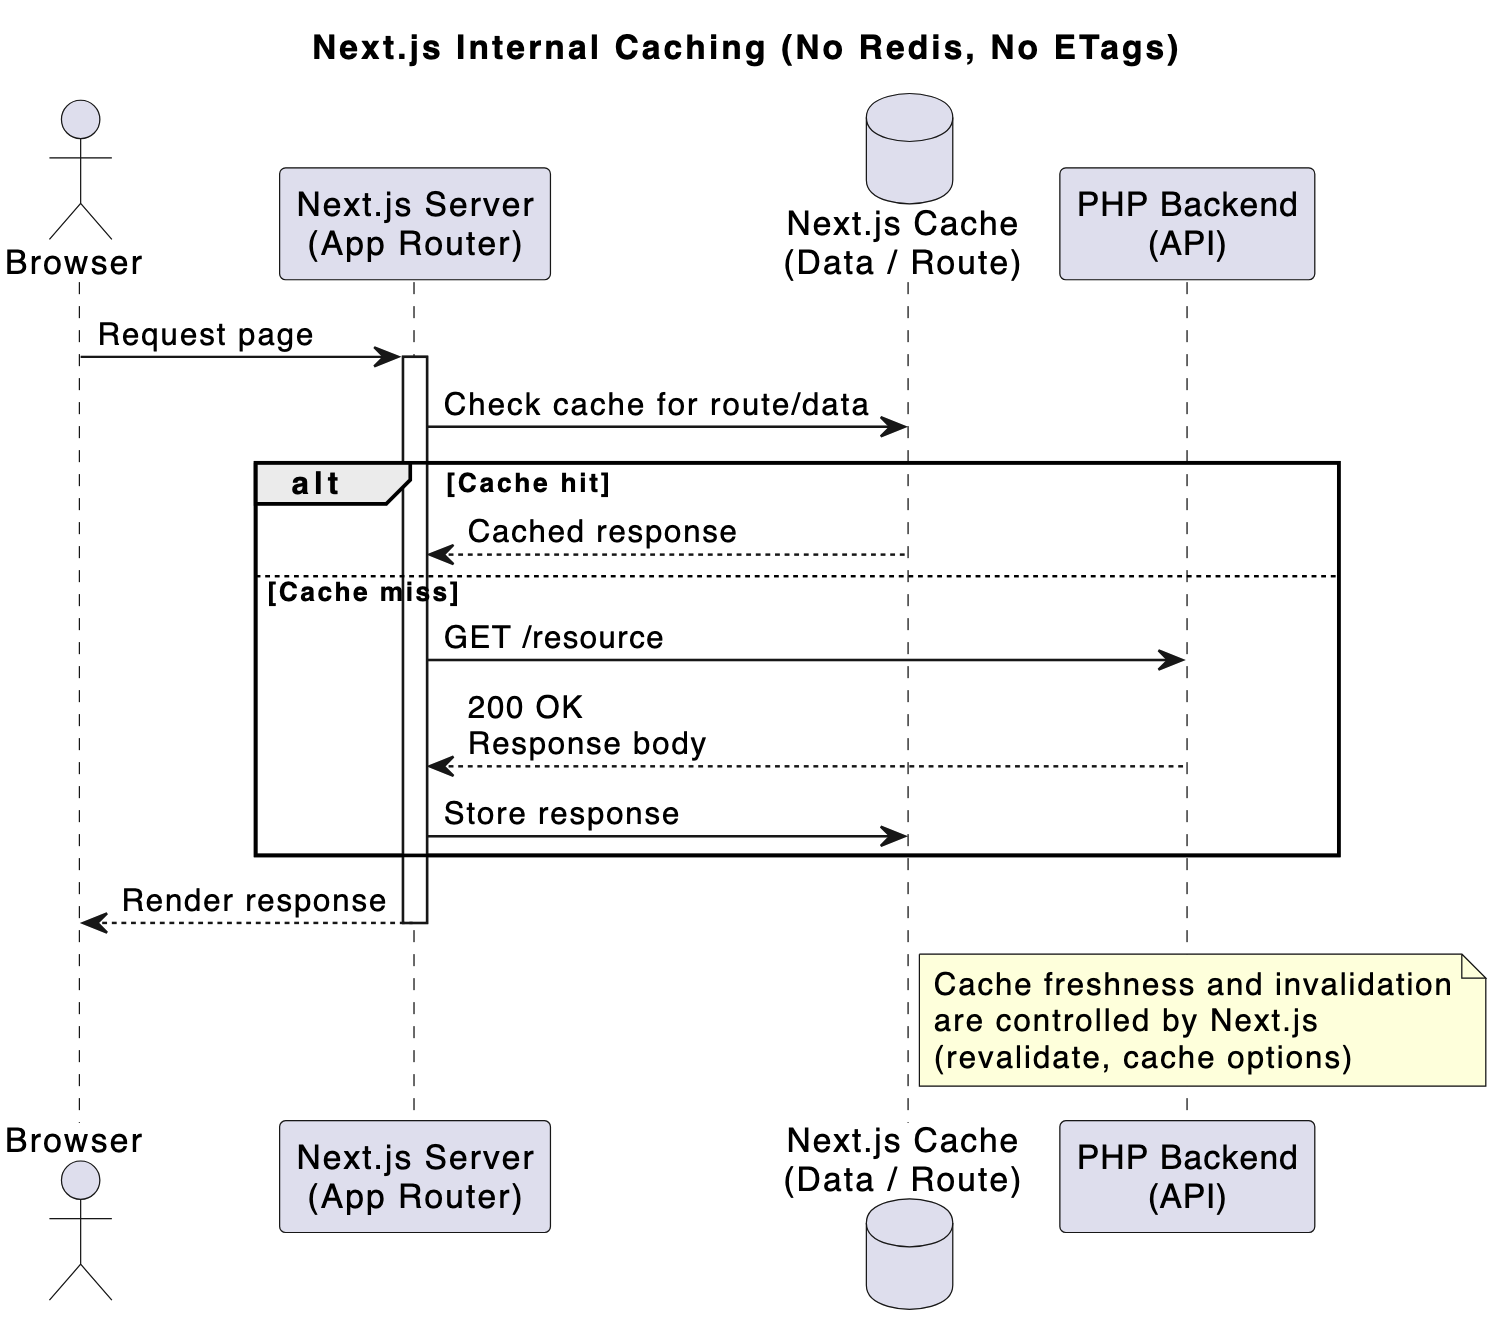
with Redis/Etag: in the Happy Path, only a 304 Header is returned from the backend. No response body needs to be created – In the Sad Path, a full reponse is returned with an ETag and then cached in Redis.
Benchmarks
So how does Redis perform in comparison to Next.js built-in caches? Using hey, I ran 200 requests against the Next.js endpoint with a concurrency of 2.
I get the following results:
- Without Next.js caching: Total: 29.7909 secs, Requests/sec: 6.7135
- With Next.js caching: Total: 13.2674 secs, Requests/sec: 15.0745
- With Redis caching: Total: 10.3989 secs, Requests/sec: 19.2328
Compared to Next.js’s built-in caching, Redis delivered a ~27% performance improvement, which is somewhat surprising given that both approaches rely on in-memory storage.
Conclusion
Adding Redis as an explicit caching layer provided two major benefits:
- Improved Performance – a 27% boost in performance is quite substantial.
- Backend-controlled freshness Moving cache invalidation logic to the PHP backend provides better control, particularly when data is driven by a CMS or database. The backend already knows when content changes, making it a natural place to define freshness.
This approach is best suited for server components / server-side fetches where there are frequent requests to backend endpoints.
This experiment is intentionally simple and does not cover: form submissions or handling authentication, cookies/sessions.
When further optimizing both backend and frontend, I reach up to a 50% improvement in performance and a 20-35% reduction in latency. Here are some possible routes for further improvements:
- Reduce the size of the payload. (from 1MB to a more realistic 260KB)
- Reduce or eliminae JSON parsing and expensive
stringifycalls - Add Gzip compression
- use HTTP/2
- Use a faster hash algorithm


