In this first article you will learn how to base your WordPress and WooCommerce project entirely on Composer and on WPackagist. The actual performance boost this will give you depends on how old your current WordPress core and plugin versions currently are.
Updating the WordPress Core and your Plugins is very important because your store will benefit from improved performance and improved security. Unfortunately, doing that can be a time consuming and difficult task. Although WordPress 5.6 improved the update/upgrade logic, but it is still far from optimal and does not give the control or stability one needs when running an eCommerce store. You can make the process of updating WordPress or its plugins easier by using modern tools like Composer, using the WPackagist WordPress plugin repository, and host your projects on GitHub. That’s why I consider this first tutorial in the series a very important one.
As a side note I would like to mention the excellent Bedrock framework here as well. It does exactly what we want to achieve in this tutorial: to base your WordPress & WooCommerce environment on Composer, WPackagist and by doing so establishing a rock solid structure for your project. That said, we want to learn about the hows and whys â so let’s get our hands dirty with some real examples.
To get started, let’s setup WordPress with Composer. Note, that we will start from scratch with an empty project here. If you have an existing project, that you want to improve, then start here as well. Later on, you will add your existing theme and plugins to this new project structure.
Step 1: Create the project
I use macOS, so I install Composer with Homebrew. Alternatively, you can follow the installation instructions on the Composer website.
brew install composer
mkdir -p ~/Sites/my-project
cd ~/Sites/my-project
composer init
This installed composer, created a directory for our project and starts the composer initialization wizard, that helps us create our composer.json file.
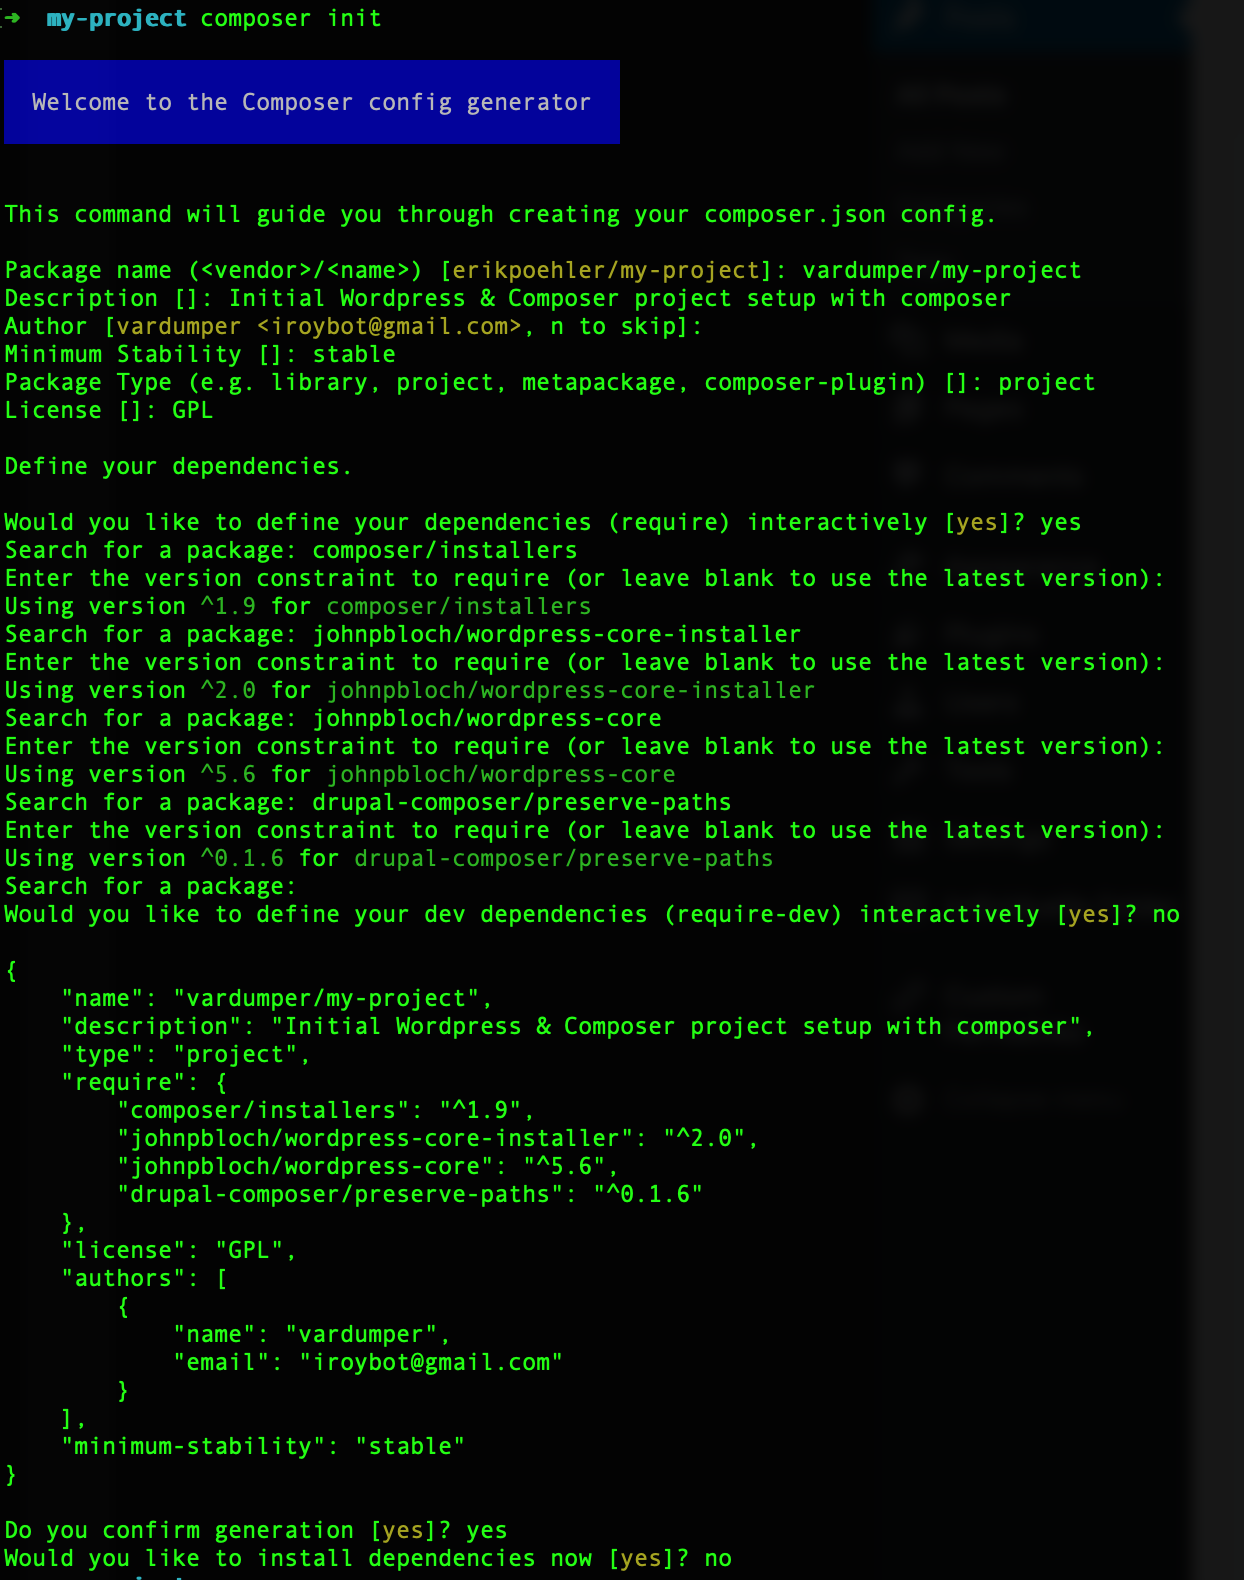
Like in my screenshot, choose a project handle (it consists of "<organization>/<project-name>"), a project description, confirm your author name and email, set the stability to stable, set a project type of project and choose the following package dependencies.
When asked wether to install these dependencies right away, write no. We want to make adjustments to the composer.json before we actually install the dependencies we entered.
composer/installersjohnpbloch/wordpress-core-installerjohnpbloch/wordpress-coredrupal-composer/preserve-paths
By leaving the version constraint empty, composer automatically detected the latest (stable) version of the package, as you can see below.
Step 2: Modify the composer.json
Open the newly created composer.json with an editor of your choice (for example nano) and add the following code right before the closing bracket of the JSON object. Composer doesn’t forgive any syntax errors in the JSON file, so you need to make sure it is actually valid JSON. You can use this online JSON Formatter if you don’t have an editor that detects possible errors.
composer.json,"repositories" : [{
  "type" : "composer",
  "url" : "https://wpackagist.org"
}, {
  "type" : "composer",
  "url" : "https://packagist.org"
}],
"extra" : {
  "installer-paths" : {
  "wordpress/wp-content/plugins/{$name}/" : [
    "type:wordpress-plugin"
  ],
  "wordpress/wp-content/themes/{$name}/" : [
    "type:wordpress-theme"
  ]},
  "wordpress-install-dir" : "wordpress",
  "preserve-paths" : [
    "wordpress/robots.txt",
    "wordpress/wp-config.php",
    "wordpress/wp-content/themes/storefront-child",
    "wordpress/wp-content/plugins/perfmatters"
  ]
}
Explanation: the first repositories section adds the wpackagist sources to composer which allows us installing and updating plugins and themes from wpackagist.org’s directory with composer.
The second part under extra, defines where packages of the types wordpress-plugin and wordpress-theme are installed to.
Then there is the installation location where WordPress is going to be installed to, namely a subdirectory by the name of wordpress. You might adjust this if you prefer ‘public’ or ‘web’ for example. This will also be your Document Root, later on.
And finally, a list of paths inside the preserve-paths section is for files or folders, from the following categories:
- files or folders you want in your repository although they are not a part of the WordPress Core. So for example a
robots.txtwhich you want to be part of your repository. Also your customisedwp-config.phpshould be listed here, or your theme and child theme which you will add later on. Otherwise these files would be lost and replaced with what’s in the original repository each timecomposer update/installis executed. We don’t want that, so we add these here. This is a good reason to add an entry to the preserve-paths section. - paid plugins or old plugins that are not available on wpackagist or github. If a plugin is not available for automatic installation via our dependency manager, we can just drop it into the
wordpress/wp-content/pluginsfolder. When we run composer update or composer install to update all the other plugins or the WordPress core, composer doesn’t know about this plugin, so it would remove it. This is why we add these plugins to the preserve-paths section as well. You should avoid adding old or paid plugins if possible since updating them is a rather manual process and it undermines the idea of dependency management. - files and folders from either the WordPress Core or a Plugin which you have to modify because there’s no hook or filter you can take advantage of in order to achieve what you need. After running composer update or install, the core modifications you made would be lost – because composer replaces it with the latest and greatest version of these files.
The complete composer.json should look like this now:
composer.json{
    "name": "vardumper/my-project",
    "description": "Initial WordPress & Composer project setup with composer",
    "type": "project",
    "require": {
        "composer/installers": "^1.9",
        "johnpbloch/wordpress-core-installer": "^2.0",
        "johnpbloch/wordpress-core": "^5.6",
        "drupal-composer/preserve-paths": "^0.1.6"
    },
    "license": "GPL",
    "authors": [
        {
            "name": "vardumper",
            "email": "iroybot@gmail.com"
        }
    ],
    "minimum-stability": "stable",
    "repositories" : [{
        "type" : "composer",
        "url" : "https://wpackagist.org"
    }, {
         "type" : "composer",
         "url" : "https://packagist.org"
    }],
    "extra" : {
        "installer-paths" : {
            "wordpress/wp-content/plugins/{$name}/" : [
                "type:wordpress-plugin"
            ],
            "wordpress/wp-content/themes/{$name}/" : [
                "type:wordpress-theme"
            ]
        },
        "wordpress-install-dir" : "wordpress",
        "preserve-paths" : [
            "wordpress/robots.txt",
            "wordpress/wp-config.php",
            "wordpress/wp-content/themes/storefront-child",
            "wordpress/wp-content/plugins/perfmatters"
        ]
    }
}
Step 3: Ready to install
We’re good to go now, so let’s install everything.
Simply run composer install.
Step 4: Install or add your theme
Here you have several options:
Option 1: If you already have a running WooCommerce store with a custom made theme, then add your theme now.
Simply copy your existing theme folder into the wordpress/wp-content/themes directory and then add its full path to the preserve-paths section of the composer.json like I did above with storefront-child (or simply change storefront-child to your theme name for that matter).
Option 2: You want to use a pre-made theme available on wpackagist (for example Storefront) then simply install it with:composer require wpackagist-theme/storefront
And as it is a common practice with WordPress, you will want to extend it by creating a child theme in your theme folder.
All you need is the new folder storefront-child, and a style.css inside with:
wordpress/wp-content/themes/storefront-child/style.css/**
Theme Name: Storefront Child
Description: This is a child theme for Storefront Theme
Author: Myself
Template: storefront
Version: 1.0
*/
Finally, don’t forget to add your child themes path to the preserve-paths section of your composer.json like I have done it in the composer.json above. If you don’t do so, installing or updating your project with composer will remove your child theme folder from the themes directory.
Option 3: You want to use one of WordPress default themes. Then you’re all set.
Step 5: Add WooCommerce
Type composer require wpackagist-plugin/woocommerce and hit enter. This installs WooCommerce.
Step 6: Database setup and Server start
If you don’t have MySQL installed yet, install it. I highly recommend you to use the latest version 8.0 on all of your server(s). Use brew install mysql or download the latest installer from the dev.mysql.com download page. Then connect to MySQL with mysql -u root -p and create a local MySQL user and database:
CREATE DATABASE `my-project`;
CREATE USER 'my-project'@'localhost' IDENTIFIED WITH mysql_native_password BY 'my-password';
GRANT ALL PRIVILEGES ON `my-project`.* TO 'my-project'@'localhost' WITH GRANT OPTION;
FLUSH PRIVILEGES;
Every web developer has their own preferences in regards to the server, some use MAMP, XAMPP, most developers have heard of Docker, Vagrant, Laravel Homestead. Others prefer installing PHP & Nginx/Apache. And so on so forth. Personally I prefer Laravel Valet but for the sake of simplicity, let’s use PHP’s built-in server right now:
php -S localhost:8080 -t wordpressFor simplicity you can add a script to composer.json which runs exactly that line.
"scripts" : {
	"serve" : "php -S localhost:8080 -t wordpress &> /dev/null"
}
This way you can type composer serve to start the server.
Now open http://localhost:8080 in your browser. You will be guided through WordPress’s install routine. After finishing the installation in the browser, activate your new storefront-child theme, and activate WooCommerce.
Adding, removing and updating plugins
Now that was easy. WordPress is installed. Now how do you work with Composer?
composer require wpackagist-plugin/manage-notification-emails # add a plugin
composer remove wpackagist-plugin/woocommerce # remove a plugin
composer update wpackagist-plugin/woocommerce # update a single package
Updating the WordPress core and plugins at once
Let’s say there’s a new WordPress release. Or maybe a plugin you’re using has some important security or performance improvements. Or some weeks or months have passed and you just want to update plugins and wordpress. All you need to do now is a simple: composer update
Some tips
To keep updating as hassle-free as possible, avoid using too many, closed-source, non-versioned plugins that are neither on GitHub nor on WPackagist. Updating these plugins will require manual steps. You need to manually download the latest version, replace the folder in your repository, and worst of all you need to investigate if and when a new version is released.
Download
Let’s continue with part 2 “Using an .env file for database and other credentials“


